Spring Cloud(十八):消息驱动-Stream 绑定器实现之 RabbitMQ,Kafka
Spring Cloud Stream 提供了 Rabbit 和 Kafka 的绑定器实现,但 Rabbit 与 Kafka 的实现结构并不完全相同,这两者与 Spring Cloud Stream 提供的绑定器实现的关联概念需要了解清楚。
Spring Cloud Stream Kafka Binder 参考指南,Spring Cloud Stream RabbitMQ Binder 参考指南,Github > spring-cloud-stream-binder-rabbit,Github > spring-cloud-stream-binder-kafka。
- RabbitMQ 绑定器:在 RabbitMQ 中,通过 Exchange 交换器实现 Spring Cloud Stream 共享主题概念,所以消息通道的输入输出目标映射为了一个具体的 Exchange 交换器。而对于每个消费组,则会对应 Exchange 交换器绑定的 Queue(队列)。
- Kafka 绑定器:Kafka 自身就有了 Topic 概念,所以 Spring Cloud Stream 直接引入了 Kafka 的 Topic 主题概念,每个消费组的通道目标都会直接连接 Kafka 的主题进行消息收发。
绑定器实现依赖已经包含了 spring-cloud-stream ,所以添加该依赖步骤可省略。
Kafka 绑定器
Kafka 绑定器依赖
使用 Apache Kafka 绑定器,需要添加 spring-cloud-stream-binder-kafka 依赖:
1 | <dependency> |
或者使用 Spring Cloud Stream Kafka Starter,starter 包已经包含了 binder 包
1 | <dependency> |
Kafka 绑定器概念
下图显示了 Apache Kafka 绑定器如何运行的简化图:
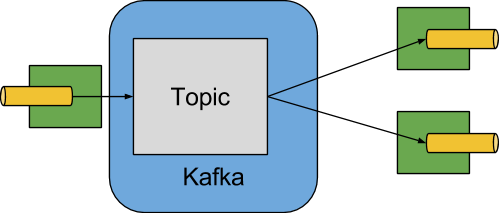
Apache Kafka Binder 实现将每个目标映射到 Apache Kafka 主题。 消费者组直接映射到相同的Apache Kafka 组。 分区也直接映射到 Apache Kafka 分区。
Kafka 绑定器属性
Kafka 绑定器属性:
属性类:org.springframework.cloud.stream.binder.kafka.properties.KafkaBinderConfigurationProperties
属性前缀:
spring.cloud.stream.kafka.binder.*Kafka 绑定通道属性:
属性类:org.springframework.cloud.stream.binder.kafka.properties.KafkaBindingProperties
Kafka 绑定通道属性类里只有消费者属性类 KafkaProducerProperties 和 生产者属性类 KafkaConsumerProperties 两个。
Kafka 生产者属性:
属性类:org.springframework.cloud.stream.binder.kafka.properties.KafkaProducerProperties
属性前缀:
spring.cloud.stream.kafka.bindings.<channelName>.consumer.*为了避免重复,Spring Cloud Stream 支持以
spring.cloud.stream.default.<property>=<value>格式设置所有通道的值。Kafka 消费者属性:
属性类:org.springframework.cloud.stream.binder.kafka.properties.KafkaConsumerProperties
属性前缀:
spring.cloud.stream.kafka.bindings.<channelName>.producer.*为了避免重复,Spring Cloud Stream 支持以
spring.cloud.stream.default.<property>=<value>格式设置所有通道的值。
Kafka 死信主题
框架无法预测用户将如何处理死信消息,所以不提供任何标准机制来处理它们。如果死信的原因是暂时的,可能希望将消息路由回原始主题;如果问题是一个永久性问题,就可能会导致无限循环。
以下示例 Spring Boot 应用程序是如何将死信消息路由回原始主题的,并且在三次尝试之后它将它们移动到 parking lot 主题。该应用也是一个 spring-cloud-stream 应用程序,它从死信主题中读取,如果 5 秒内没有收到任何消息时终止。
这些示例假设原始目标是 so8400out ,消费者组是 so8400。有几种策略需要考虑:
- 考虑仅在主应用程序未运行时运行重新路由。否则,瞬态错误的重试会很快耗尽。
- 或者,使用两阶段方法:使用此应用程序路由到第三方主题,使用另一个路由从第三方主题返回到主主题。
以下代码示例代码:
application.properties
1 | =so8400replay |
Application
1 |
|
Kafka 绑定器分区
Apache Kafka 原生就支持分区。
有时候需要将带有特定标识的数据发送到指定的分区,就需要使用到分区功能来实现。
以下示例显示如何配置生产者和消费者方:
1 |
|
application.yml
1 | spring: |
备注:必须为主题提供足够的分区,以便实现所有消费者组所需的并发性。上述的配置最多支持 12个 消费者实例,即最多支持 12 分区(如果并发性为 2,则为 6个实例,如果并发性为 3,则为 4 个实例,依此类推)。 通常最好 over-provision(过度配置)分区以允许将来增加消费者或并发性。
备注:上述配置使用默认分区(key.hashCode() % partitionCount)。 根据键值,这可能会或可能不会提供适当平衡的算法。 也可以使用 partitionSelectorExpression 或 partitionSelectorClass 属性覆盖此默认值。
由于分区是由 Kafka 本地处理的,因此消费者方面不需要特殊配置,Kafka 在实例之间分配分区。
以下 Spring Boot 应用监听 Kafka 流并打印(到控制台)每条消息对应的分区ID:
1 |
|
application.yml
1 | spring: |
根据需要添加实例,Kafka 重新平衡分区分配。如果实例数(或实例数 x 并发)超过分区数,则某些消费者处于空闲状态。
RabbitMQ 绑定器
RabbitMQ 绑定器依赖
使用 Rabbit MQ 绑定器,需要添加 spring-cloud-stream-binder-rabbit 依赖:
1 | <dependency> |
或者使用 Spring Cloud Stream RabbitMQ Starter,starter 包已经包含了 binder 包
1 | <dependency> |
RabbitMQ 绑定器概念

默认情况下,RabbitMQ Binder 实现将每个 目标 映射到 TopicExchange,将每个消费者组映射到 Queue,Queue 绑定到 TopicExchange。
每个应用消费者实例都有相应的 RabbitMq 消费者实例,作为其组的 Queue。
对于分区生产者和消费者,Queue 以分区索引为后缀,并使用分区索引作为路由键。对于匿名使用者(没有组属性的用户),使用自动删除队列(auto-delete queue),具有随机的唯一名称。
通过使用可选的 autoBindDlq 选项,可以配置绑定器以创建和配置死信队列(DLQ)(以及死信交换 DLX,路由基础结构)。
默认情况下,死信队列具有目标的名称,并附加.dlq。
如果启用了重试(maxAttempts > 1),则在重试耗尽后,失败的消息将传递到 DLQ。
如果禁用重试(maxAttempts = 1),则应将 requeueRejected 设置为 false(默认值),以便将失败的消息路由到 DLQ,而不是重新排队。
此外,republishToDlq 使绑定器将失败的消息发布到 DLQ(而不是拒绝它)。此功能允许将额外信息信息(例如 x-exception-stacktrace 标头中的堆栈跟踪)添加到消息头中。
关于获取(截断)堆栈跟踪的信息,请参阅 frameMaxHeadroom 属性。此选项不需要启用重试,可以在一次重试后重新发布失败的消息。
从1.2 版开始,可以配置重新发布的消息的传递模式。请参见 republishDeliveryMode 属性。
如果流监听器抛出 ImmediateAcknowledgeAmqpException,则绕过 DLQ 并简单地丢弃该消息。从版本 2.1 开始,不管 republishToDlq 的设置什么都是这样处理,以前只有当 republishToDlq 为 false 时才这样。
框架不提供任何标准机制来消费死信消息(或将它们重新路由回主队列)。死信队列处理中描述了一些选项。
注意:将 requeueRejected 设置为 true(使用 republishToDlq = false)会导致消息重新排队并不断重新传递,这可能不是我们想要的,除非失败的原因是暂时的。 通常,应该通过将 maxAttempts 设置为大于 1 或将 republishToDlq 设置为 true 来在绑定器中启用重试。
注意:当在 Spring Cloud Stream 应用中使用多个 RabbitMQ 绑定器时,禁用 RabbitAutoConfiguration 非常重要,以避免将 RabbitAutoConfiguration 的相同配置应用于两个绑定器。可以使用 @SpringBootApplication 注解来排除类。
备注:从2.0版开始,RabbitMessageChannelBinder 将RabbitTemplate.userPublisherConnection 属性设置为 true,以便非事务生产者避免消费者死锁,如果缓存连接由于代理上(消息中间件)的内存告警而被阻塞,则可能会发生这种情况(死锁)。
备注:目前,只用消息驱动的消费者才支持多路复用消费者(监听多个队列的单个消费者);被轮询的消费者只能从单个队列中检索消息。
RabbitMQ 绑定器属性
RabbitMQ 绑定器属性:
属性类:org.springframework.cloud.stream.binder.rabbit.properties.RabbitBinderConfigurationProperties
默认情况下,RabbitMQ 绑定器使用 Spring Boot 的 ConnectionFactory。因此,它支持所有 Spring Boot 配置项。
RabbitMQ Spring Boot 配置项属性前缀:spring.rabbitmq.*。
RabbitMQ 绑定器属性前缀:spring.cloud.stream.rabbit.binder.*;属性 默认值 描述 备注 adminAddresses empty RabbitMQ 管理插件 URL 地址 String 数组 nodes empty RabbitMQ 集群节点名称 String 数组 compressionLevel 1 (BEST_LEVEL) 压缩绑定的压缩级别 参考:java.util.zip.Deflator connectionNamePrefix none 绑定器连接名称前缀 Spring AMQP default RabbitMQ 消费者属性:
属性类:org.springframework.cloud.stream.binder.rabbit.properties.RabbitConsumerProperties为避免重复,Spring Cloud Stream 支持以
spring.cloud.stream.default.<property>=<value>的格式设置所有通道的值。Rabbit 消费者属性前缀:
spring.cloud.stream.rabbit.bindings.<channelName>.consumer.*高级监听器容器配置
要设置设置监听器容器属性,这些属性不作为绑定器和通道绑定的属性公开。在应用上下文中添加 ListenerContainerCustomizer 类型的单例 Bean。
设置绑定器和通道绑定属性,然后调用自定义配置。自定义配置( configure() 方法 )提供对队列名称及消费者组作为参数。RabbitMQ 生产者属性:
属性类:org.springframework.cloud.stream.binder.rabbit.properties.RabbitProducerProperties,继承自 RabbitCommonProperties。
为了避免重复,Spring Cloud Stream 支持以
spring.cloud.stream.default.<property>=<value>的格式设置所有通道的值。Rabbit 生产者属性前缀
spring.cloud.stream.rabbit.bindings.<channelName>.producer.*
使用存在的队列/交换器
默认情况下,绑定器将自动提供主题交换,其名称是从目标绑定属性<prefix> <destination>的值派生的。
如果未提供目标名,则目标默认为绑定名称。绑定消费者时,将自动为队列配置名称<prefix> <destination>.<group>(如果指定了组绑定属性),或者在没有配置组时使用匿名自动删除队列。
对于非分区绑定,队列将绑定到具有match-all通配符路由密钥(#)的交换;对于分区绑定,该队列将绑定到<destination>-<instanceIndex>。默认情况下,prefix 为空字符串(String)。如果使用 requiredGroups 指定了输出绑定,则为每个组配置队列 / 绑定。
有许多特定的 Rabbit 绑定属性来允许修改默认配置。
如果希望使用现有的交换 / 队列,则可以完全禁用自动配置,假设交换机名为 myExchange 且队列名为 myQueue,配置如下:
1 | name>.destination=myExhange |
如果希望绑定器提供 队列 / 交换,但又需要使用默认值以外的其他值进行设置,请使用以下属性:
1 | name>.consumer.bindingRoutingKey=myRoutingKey |
当 autoBindDlq 为 true 时,声明死信交换 / 队列时使用类似的属性。
RabbitMQ 绑定器重试
如果在绑定器中启用了重试,则监听器容器线程将在配置的任何回退期间挂起。当需要对单个消费者进行严格的订阅时,这可能很重要。但是,对于其他用例,这会阻止在该线程上处理其他消息。
绑定器重试的一个替代方法是设置死信,并在死信队列(dlq)上设置生存时间以及 dlq 本身的死信配置。可以使用以下示例配置启用此功能:
- 设置 autoBindDlq=true,绑定器将创建死信队列(DLQ),也可以通过 deadLetterQueueName 指定名称。
- 设置 dlqTtl 属性,指定重传与回退的间隔时间。
- 将 dlqDeadLetterExchange 设置为默认交换。 来自 DLQ 的过期消息被路由到原始队列,因为默认的deadLetterRoutingKey 是队列名称(destination.group)。 要设置为默认交换,需将属性设置为无值,如下示例。
若要强制将消息设置为死信,需抛出 amqPrejectAndDonTrequeueException,或者将 Requerejected 设置为true(默认值)并引发任何异常。
循环继续进行,没有结束,这对于暂时性的问题是很好的,但是可能希望在一些尝试之后放弃,幸运的是,RabbitMQ 提供了 x-death 头,它允许您确定已经发生循环了多少个周期。
要在放弃后确认消息,请抛出 ImmediateAcknowledgeAmqpException 异常。
以下配置创建一个名为 myDestination 的 Exchange,其中队列 myDestination.consumerGroup 绑定到一个主题交换,并使用通配符路由键 #:
1 | =myDestination |
此配置创建一个绑定到直接交换(DLX)的 DLQ,路由键为 mydestination.consumerGroup。当消息被拒绝时,它们被路由到DLQ。5秒后,消息将过期,并使用队列名称作为路由键路由到原始队列,如下面的示例所示:
1 |
|
注意: x-death 头中的 count 属性是 Long 类型。
RabbitMQ 错误通道
从1.3版开始,绑定器无条件地将异常发送到每个消费者目标的错误通道,还可以配置为将异步生产者发送失败发送到错误通道。
RabbitMQ 有两种发送失败类型:
- 返回消息。
- 否认发布者的确认。
后者很少见。 根据 RabbitMQ 文档:只有在负责队列的 Erlang 进程中发生内部错误时才会传递 [A nack]。
除了启用生成器错误通道,如果连接工厂配置正确,RabbitMQ 绑定器仅向通道发送消息,如下所示:
- ccf.setPublisherConfirms(true);
- ccf.setPublisherReturns(true);
当使用 Spring Boot 配置连接工厂,设置以下属性:
- spring.rabbitmq.publisher-confirms
- spring.rabbitmq.publisher-returns
返回消息的 ErrorMessage 的有效负载是一个具有以下属性的 ReturnedAmqpMessageException:
- failedMessage:发送失败的 spring-messaging Message<?>。
- amqpMessage:原始 spring-amqp 消息。
- replyCode:一个整数值,表示失败的原因(如,312 - 没有路由)。
- replyText:一个文本值,表示失败的原因(如,NO_ROUT)。
- exchange:消息发布到此 Exchang。
- routingKey:当发布消息时使用的路由键。
对于否定确认,有效负载是一个 NackedAmqpMessageException 异常,具有以下属性:
- failedMessage:发送失败的 spring-messaging Message<?>。
- nackReason:NCK 原因(如果可用,需要检查消息中间件日志以了解更多异常信息)。
RabbitMQ 绑定器没有自动对这些异常进行处理(例如,发送到死信队列)。可以使用自己的 Spring Integration flow 来使用这些异常。
RabbitMQ 死信队列
由于框架无法预测用户希望如何处理 死信消息,因此不提供任何标准机制来处理这些死信息息。
如果死信的原因是暂时的(例如,网络抖动),可能希望将消息路由回原始队列。如果问题是一个永久性的问题,这样可能会导致无限循环
以下 Spring Boot 应用显示如何处理死信,对于非分区目标示例了 重试 和 交换延时 两种方式。
非分区目标
这些示例假设原始目标是 so8400in,消息者组是 so8400。
- 将失败的消息路由回原始队列,在三次尝试后将它们移到第三方 parking lot 队列的示例。
1
2
3
4
5
6
7
8
9
10
11
12
13
14
15
16
17
18
19
20
21
22
23
24
25
26
27
28
29
30
31
32
33
34
35
36
37
38
39
40
41
42
43
44
45
46
47
public class ReRouteDlqApplication {
//原始队列
private static final String ORIGINAL_QUEUE = "so8400in.so8400";
//死信队列
private static final String DLQ = ORIGINAL_QUEUE + ".dlq";
//第三方队列(停车场队列)
private static final String PARKING_LOT = ORIGINAL_QUEUE + ".parkingLot";
//消息头(重试次数)
private static final String X_RETRIES_HEADER = "x-retries";
public static void main(String[] args) throws Exception {
ConfigurableApplicationContext context = SpringApplication.run(ReRouteDlqApplication.class, args);
System.out.println("Hit enter to terminate");
System.in.read();
context.close();
}
private RabbitTemplate rabbitTemplate;
//监听死信队列
public void rePublish(Message failedMessage) {
//获取重试次数
Integer retriesHeader = (Integer) failedMessage.getMessageProperties().getHeaders().get(X_RETRIES_HEADER);
if (retriesHeader == null) {
//如果未重试,则为初始化为 0
retriesHeader = Integer.valueOf(0);
}
if (retriesHeader < 3) {
//如果小于3次,则 +1
failedMessage.getMessageProperties().getHeaders().put(X_RETRIES_HEADER, retriesHeader + 1);
//发送回原始队列
this.rabbitTemplate.send(ORIGINAL_QUEUE, failedMessage);
}
else {
//重试耗尽,发送到 停车场 队列
this.rabbitTemplate.send(PARKING_LOT, failedMessage);
}
}
public Queue parkingLot() {
//创建停车场队列
return new Queue(PARKING_LOT);
}
} - 使用 RabbitMQ 延迟消息交换为重新排队的消息引入延迟。
在此示例中,每次尝试的延迟都会增加。 这些示例使用 @RabbitListener 从 DLQ 接收消息。还可以在批处理中使用 **RabbitTemplate.receive()**。
1 |
|
分区目标
对于分区目标,所有分区都有一个DLQ。从失败消息的头部确定原始队列,republishToDlq 属性指定是否将带有诊断头的失败消息发送到 DLQ。
republishToDlq=false 情况,从 x-death 头获取原始队列。
当 republishToDlq 为 false 时,RabbitMQ 将消息发布到 DLX / DLQ,并带有包含有关原始目标的信息的 x-death 头,如以下示例所示:
1
2
3
4
5
6
7
8
9
10
11
12
13
14
15
16
17
18
19
20
21
22
23
24
25
26
27
28
29
30
31
32
33
34
35
36
37
38
39
40
41
42
43
44
45
46
47
48
49
50
51
52
53
54
55
public class ReRouteDlqApplication {
private static final String ORIGINAL_QUEUE = "so8400in.so8400";
private static final String DLQ = ORIGINAL_QUEUE + ".dlq";
private static final String PARKING_LOT = ORIGINAL_QUEUE + ".parkingLot";
//是个 Map<String,?>,包含有关原始目标的信息
private static final String X_DEATH_HEADER = "x-death";
private static final String X_RETRIES_HEADER = "x-retries";
public static void main(String[] args) throws Exception {
ConfigurableApplicationContext context = SpringApplication.run(ReRouteDlqApplication.class, args);
System.out.println("Hit enter to terminate");
System.in.read();
context.close();
}
private RabbitTemplate rabbitTemplate;
public void rePublish(Message failedMessage) {
Map<String, Object> headers = failedMessage.getMessageProperties().getHeaders();
Integer retriesHeader = (Integer) headers.get(X_RETRIES_HEADER);
if (retriesHeader == null) {
retriesHeader = Integer.valueOf(0);
}
if (retriesHeader < 3) {
//重试小于 3 次,+1 继承重试
headers.put(X_RETRIES_HEADER, retriesHeader + 1);
//获取 X_DEATH_HEADER 消息头
List<Map<String, ?>> xDeath = (List<Map<String, ?>>) headers.get(X_DEATH_HEADER);
//取出目标交换器
String exchange = (String) xDeath.get(0).get("exchange");
//取出所有目标路由键
List<String> routingKeys = (List<String>) xDeath.get(0).get("routing-keys");
//发回到原始交换和队列
this.rabbitTemplate.send(exchange, routingKeys.get(0), failedMessage);
}
else {
//发送到停车场队列
this.rabbitTemplate.send(PARKING_LOT, failedMessage);
}
}
public Queue parkingLot() {
//创建对停车场队列
return new Queue(PARKING_LOT);
}
}republishToDlq=true 的情况,从失败消息的头中获取原始队列。
当 republishToDlq 为 true 时,重新发布恢复器会将原始交换和路由密钥添加到标头,如以下示例所示:
1
2
3
4
5
6
7
8
9
10
11
12
13
14
15
16
17
18
19
20
21
22
23
24
25
26
27
28
29
30
31
32
33
34
35
36
37
38
39
40
41
42
43
44
45
46
47
48
49
50
51
52
53
54
55
56
public class ReRouteDlqApplication {
private static final String ORIGINAL_QUEUE = "so8400in.so8400";
private static final String DLQ = ORIGINAL_QUEUE + ".dlq";
private static final String PARKING_LOT = ORIGINAL_QUEUE + ".parkingLot";
private static final String X_RETRIES_HEADER = "x-retries";
//定义原始交换头
private static final String X_ORIGINAL_EXCHANGE_HEADER = RepublishMessageRecoverer.X_ORIGINAL_EXCHANGE;
//定义原始路由键
private static final String X_ORIGINAL_ROUTING_KEY_HEADER = RepublishMessageRecoverer.X_ORIGINAL_ROUTING_KEY;
public static void main(String[] args) throws Exception {
ConfigurableApplicationContext context = SpringApplication.run(ReRouteDlqApplication.class, args);
System.out.println("Hit enter to terminate");
System.in.read();
context.close();
}
private RabbitTemplate rabbitTemplate;
//监听死信队列
public void rePublish(Message failedMessage) {
//取出所有头信息
Map<String, Object> headers = failedMessage.getMessageProperties().getHeaders();
//取出重试次数信息
Integer retriesHeader = (Integer) headers.get(X_RETRIES_HEADER);
if (retriesHeader == null) {
retriesHeader = Integer.valueOf(0);
}
if (retriesHeader < 3) {
//重试小于3次,+1
headers.put(X_RETRIES_HEADER, retriesHeader + 1);
//取出原始交换器
String exchange = (String) headers.get(X_ORIGINAL_EXCHANGE_HEADER);
//取出原始路由键
String originalRoutingKey = (String) headers.get(X_ORIGINAL_ROUTING_KEY_HEADER);
//发送到原始交换和队列
this.rabbitTemplate.send(exchange, originalRoutingKey, failedMessage);
}
else {
//发送到停车场队列
this.rabbitTemplate.send(PARKING_LOT, failedMessage);
}
}
public Queue parkingLot() {
//创建停车场队列
return new Queue(PARKING_LOT);
}
}
RabbitMQ 绑定器分区
RabbitMQ 原生并不支持分区。
有时,将数据发送到指定分区是有必要的(有利的)。例如,当需要严格指定消费者时,特定客户的所有消息都应转到同一分区。RabbitMessageChannelBinder 通过将每个分区的队列绑定到目标交换来提供分区功能。
下面的 Java 和 YAML 示例演示如何配置生产者:
Producer
1 |
|
application.properties
1 | =partitioned.destination |
备注: 上面示例中的配置使用默认的分区( key.hashCode() % partitionCount )。这是否提供合适的均衡算法,取决于键值,可以使用 partitionSelectorExpression 或 partitionSelectorClass 属性覆盖此默认值。
只有在部署生产者时需要配置消费者队列时,才需要 required-groups 属性。
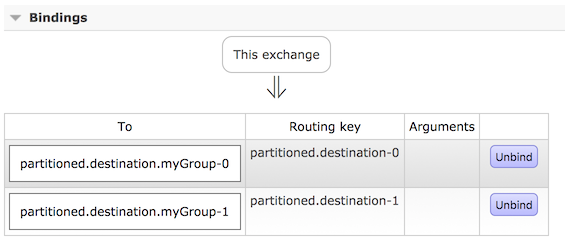
上面配置会提供一个主题交换:

上面配置会创建两个队列绑定到交换器:

上面绑定会把队列和交换进行关联:
下面 Java 和 Properties 示例继续前面的示例,并展示如何配置消费者:
Consumer
1 |
|
application.properties
1 | =partitioned.destination |
备注:RabbitMessageChannelBinder 不支持动态缩放。每个分区必须至少有一个消费者。消费者的 instanceIndex 用于指示使用了哪个分区。像 CloudFoundry 这样的平台只能有一个实例具有 InstanceIndex 。
Spring Cloud(十八):消息驱动-Stream 绑定器实现之 RabbitMQ,Kafka
http://blog.gxitsky.com/2019/05/18/SpringCloud-18-stream-binder-implement/