Spring Boot 2系列(五十四):分布式文件服务 FastDFS 安装与集成
项目需要用到文件服务,外网使用阿里云的 OSS 对象存储,内网优先考虑 FastDFS,备选 go-fastdfs 。
FastDFS 是一款开源的轻量级的分布式文件系统,功能主要包括:文件存储、文件同步、文件访问(文件上传、文件下载)等,解决了文件大容量存储和高性能访问的问题。FastDFS特别适合以文件为载体的在线服务,如图片、视频、文档等等。–摘自官方说明。
FastDFS 的官方文档极少,不便于快速学习用使用,需要个人整理总结。在源码的根目录下有个 INSTALL 的文件,里面记录的是安装 FastDFS 服务的安装步骤。
Github > FastDFS,Gitee > FastDFS,go-fastdfs ,fastdfs-client-java。另可参考 tobato/FastDFS_Client 文档。
FastDFS
概念介绍
特点
FastDFS特点如下:
- 分组存储,简单灵活;
- 等结构,不存在单点;
- 文件 ID 由 FastDFS 生成,作为文件访问凭证。FastDFS 不需要传统的 name server 或 meta server;
- 大、中、小文件均可以很好支持,可以存储海量小文件;
- 一台storage支持多块磁盘,支持单盘数据恢复;
- 提供了nginx扩展模块,可以和nginx无缝衔接;
- 支持多线程方式上传和下载文件,支持断点续传;
- 存储服务器上可以保存文件附加属性。
架构图
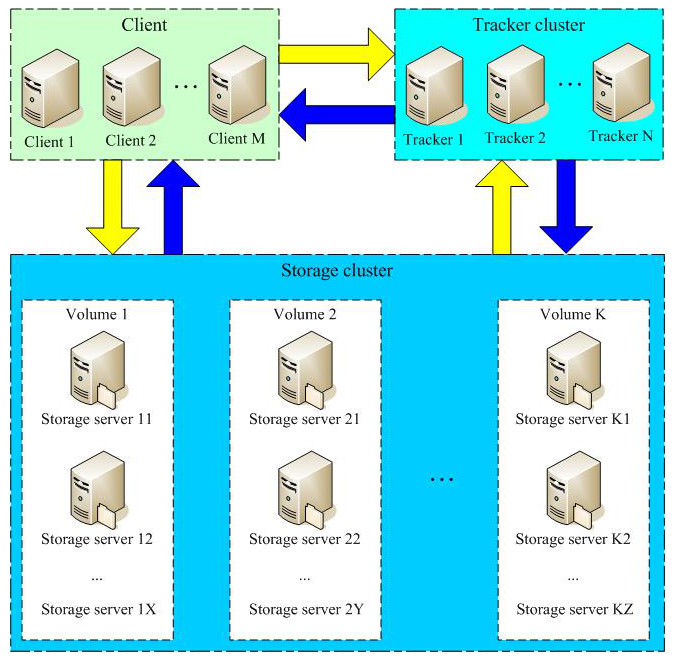
组成部分
从架构图中可以看出 FastDFS 整个应用服务由三部分组成:
- Tracker Server:跟踪服务器,管理 Storage Server 存储集群,负责调度工作,支持负载均衡,每个 Storage Server 启动后都会与跟踪服务建立连接,告知自己所属的 Group 信息,并保持心跳检测。Tracker Server 相当于 注册中心,协调者的角色。
- Storage Server:存储服务器,提供存储容量和备份服务,以 Group 为单位,每个 Group 内可以有多台 Storage Server,数据互为备份。
- Client:客户端,执行上传下载数据的操作,通常是业务应用服务器。官方提供了 C 和 Java 的客户端库,PHP 客户端扩展库。
服务安装
参考源码包根目录下的 INSTALL 的文件。
下载安装
安装依赖库:libfastcommon
1
2
3
4
5
6
7
8
9
# step 1. download libfastcommon source codes and install it,
# github address: https://github.com/happyfish100/libfastcommon.git
# gitee address: https://gitee.com/fastdfs100/libfastcommon.git
# command lines as:
git clone https://github.com/happyfish100/libfastcommon.git
cd libfastcommon;
git checkout V1.0.43
clean && ./make.sh && ./make.sh install安装服务:fastdfs
1
2
3
4
5
6
7
8
9
# step 2. download fastdfs source codes and install it,
# github address: https://github.com/happyfish100/fastdfs.git
# gitee address: https://gitee.com/fastdfs100/fastdfs.git
# command lines as:
git clone https://github.com/happyfish100/fastdfs.git
cd fastdfs;
git checkout V6.06
clean && ./make.sh && ./make.sh install安装完后,会创建
/etc/fdfs目录,目录中存放配置的示例文件,如下示例:1
2fdfs]# ls
storage.conf.sample storage_ids.conf.sample tracker.conf.sample可以看到,有客户端配置,存储服务配置,跟踪服务配置。
修改配置
本示例演示基于 2 台 CentOS 操作系统的服务器组分建一个最小集群的 FastDFS 服务。每一台台服务器上启动 1 个跟踪服务实例 和 1个存储服务实例,2 个存储服务实例组成一个组。
设置配置文件,两台服务器执行同样的操作
进入 FastDFS 源码包的根目录
1
fastdfs-6.06]# ./setup.sh /etc/fdfs
打开
setup.sh脚本可以看到,其目的是将conf目录下的配置文件复制到/etc/fdfs目录,再次查看 /etc/fdfs 目录。执行完脚本后,/etc/fdfs目录如下:1
2
3
4# ls /etc/fdfs/
mime.types storage_ids.conf tracker.conf.sample
storage.conf storage_ids.conf.sample
storage.conf.sample tracker.conf编辑和修改 tracker,storage,client 配置文件,两台服务器做同步操作
1
2
3
4
5vi /etc/fdfs/tracker.conf
vi /etc/fdfs/storage.conf
vi /etc/fdfs/client.conf
and so on ...可以将配置文件从 Linux 下载的本地编辑,再上传覆盖。重点要修改的配置项有以下几点:
客户端配置文件:
client.conf,设置跟踪服务的地址如果
base_path的路径不存在,必须先创建,否则服务无法启动。1
2
3
4
5# 设置存放日志文件的基础路径(下面是默认路径)
base_path = /home/yuqing/fastdfs
# 跟踪服务的地址, 如果是集群部署, 可配置多个
tracker_server = 192.168.50.129:22122
tracker_server = 192.168.50.132:22122存储服务配置文件:
storage.conf,设置跟踪服务的地址如果
base_path和store_path0的路径不存在,必须先创建,否则服务无法启动。1
2
3
4
5
6
7
8
9
10
11
12# 存放数据和日志的基础路径(下面是默认路径)
base_path = /home/yuqing/fastdfs
# 存储路径个数
store_path_count = 1
# 存放文件的存储路径, 如果不存在,则使用 base_path(不推建)
store_path0 = /home/yuqing/fastdfs
#store_path1 = /home/yuqing/fastdfs2
# 跟踪服务的地址, 如果是集群部署, 可配置多个
tracker_server = 192.168.50.132:22122
tracker_server = 192.168.50.129:22122存储服务组和ID配置文件:
storage_ids.conf,设置存储服务的 IP把存储服务划分到组中,一个组可以有多个存储服务。
1
2100001 group1 192.168.50.129
100001 group1 192.168.50.132
备注:上面示例都是把 跟踪服务,存储服务 都部署在一台物理服务器上了,所以 IP 相同。
启动服务
两台服务器执行同样的操作
启用跟踪服务
1
2# start the tracker server:
/usr/bin/fdfs_trackerd /etc/fdfs/tracker.conf restart启用存储服务
1
2# start the storage server:
/usr/bin/fdfs_storaged /etc/fdfs/storage.conf restart可选,将应用加入取 Linux 服务启用
1
2
3# (optional) in Linux, you can start fdfs_trackerd and fdfs_storaged as a service:
/sbin/service fdfs_trackerd restart
/sbin/service fdfs_storaged restart就可以使用 Linux 的
systemctl命令执行 start,stop,reload,restart,status 等操作。如下:1
2
3systemctl restart fdfs_trackerd
systemctl restart fdfs_storaged
systemctl status fdfs_storaged示例操作:
1
2
3
4
5
6
7
8
9
10
11
12
13
14
15
16
17
18
19
20
21
22
23
24
25
26
27[root@localhost data]# systemctl status fdfs_trackerd
● fdfs_trackerd.service - LSB: FastDFS tracker server
Loaded: loaded (/etc/rc.d/init.d/fdfs_trackerd; bad; vendor preset: disabled)
Active: active (running) since 二 2020-04-21 16:03:51 CST; 45min ago
Docs: man:systemd-sysv-generator(8)
Process: 7781 ExecStop=/etc/rc.d/init.d/fdfs_trackerd stop (code=exited, status=2)
Process: 7787 ExecStart=/etc/rc.d/init.d/fdfs_trackerd start (code=exited, status=0/SUCCESS)
CGroup: /system.slice/fdfs_trackerd.service
└─7792 /usr/bin/fdfs_trackerd /etc/fdfs/tracker.conf
4月 21 16:03:51 localhost.localdomain systemd[1]: Starting LSB: FastDFS tracker server...
4月 21 16:03:51 localhost.localdomain fdfs_trackerd[7787]: Starting FastDFS tracker server:
4月 21 16:03:51 localhost.localdomain systemd[1]: Started LSB: FastDFS tracker server.
[root@localhost data]# systemctl status fdfs_storaged
● fdfs_storaged.service - LSB: FastDFS storage server
Loaded: loaded (/etc/rc.d/init.d/fdfs_storaged; bad; vendor preset: disabled)
Active: active (running) since 二 2020-04-21 16:06:02 CST; 43min ago
Docs: man:systemd-sysv-generator(8)
Process: 11309 ExecStop=/etc/rc.d/init.d/fdfs_storaged stop (code=exited, status=2)
Process: 11315 ExecStart=/etc/rc.d/init.d/fdfs_storaged start (code=exited, status=0/SUCCESS)
CGroup: /system.slice/fdfs_storaged.service
└─11320 /usr/bin/fdfs_storaged /etc/fdfs/storage.conf
4月 21 16:06:02 localhost.localdomain systemd[1]: Starting LSB: FastDFS storage server...
4月 21 16:06:02 localhost.localdomain fdfs_storaged[11315]: Starting FastDFS storage server:
4月 21 16:06:02 localhost.localdomain systemd[1]: Started LSB: FastDFS storage server.可以使用 Linux 的
netstat命令工具查看服务占用的端口1
2
3
4
5[root@localhost fastdfs]# netstat -tp
Active Internet connections (w/o servers)
Proto Recv-Q Send-Q Local Address Foreign Address State PID/Program name
tcp 0 0 192.168.50.132:22122 192.168.50.132:42361 ESTABLISHED 7792/fdfs_trackerd
tcp 0 0 192.168.50.132:42361 192.168.50.132:22122 ESTABLISHED 11320/fdfs_storaged启动服务后,就可以在
base_path路径看到 FastDFS 服务创建的存放数据的data目录,存放日志的logs目录。如下:1
2
3
4
5
6
7
8
9
10
11
12
13
14
15
16
17
18
19
20
21
22
23
24
25[root@localhost fastdfs]# ls
data logs
[root@localhost fastdfs]# ls data/
00 12 24 36 48 5A 6C 7E 90 A2 B4 C6 D8 EA FC
01 13 25 37 49 5B 6D 7F 91 A3 B5 C7 D9 EB FD
02 14 26 38 4A 5C 6E 80 92 A4 B6 C8 DA EC fdfs_storaged.pid
03 15 27 39 4B 5D 6F 81 93 A5 B7 C9 DB ED fdfs_trackerd.pid
04 16 28 3A 4C 5E 70 82 94 A6 B8 CA DC EE FE
05 17 29 3B 4D 5F 71 83 95 A7 B9 CB DD EF FF
06 18 2A 3C 4E 60 72 84 96 A8 BA CC DE F0 storage_changelog.dat
07 19 2B 3D 4F 61 73 85 97 A9 BB CD DF F1 storage_groups_new.dat
08 1A 2C 3E 50 62 74 86 98 AA BC CE E0 F2 storage_servers_new.dat
09 1B 2D 3F 51 63 75 87 99 AB BD CF E1 F3 storage_stat.dat
0A 1C 2E 40 52 64 76 88 9A AC BE D0 E2 F4 storage_sync_timestamp.dat
0B 1D 2F 41 53 65 77 89 9B AD BF D1 E3 F5 sync
0C 1E 30 42 54 66 78 8A 9C AE C0 D2 E4 F6
0D 1F 31 43 55 67 79 8B 9D AF C1 D3 E5 F7
0E 20 32 44 56 68 7A 8C 9E B0 C2 D4 E6 F8
0F 21 33 45 57 69 7B 8D 9F B1 C3 D5 E7 F9
10 22 34 46 58 6A 7C 8E A0 B2 C4 D6 E8 FA
11 23 35 47 59 6B 7D 8F A1 B3 C5 D7 E9 FB
[root@localhost fastdfs]# ls logs/
storaged.log trackerd.log可以看到,在
data目录中创建了 256 个子目录,分别是 00 - FF,上传的文件就是存放在这些子目录中。
客户端监控
运行监听应用
1
2# such as:
/usr/bin/fdfs_monitor /etc/fdfs/client.conf就会输出 跟踪服务 自己 和 收集到的存储服务的信息。如下示例:
1
2
3
4
5
6
7
8
9
10
11
12
13
14
15
16
17
18
19
20
21
22
23
24
25
26
27
28
29
30
31
32
33
34
35
36
37
38
39
40
41
42
43
44
45
46
47
48
49
50
51
52
53
54
55
56
57
58
59
60
61
62
63
64
65
66
67
68
69
70
71
72
73
74
75
76
77
78
79
80
81
82
83
84
85
86
87
88
89
90
91
92
93
94
95
96
97
98
99
100
101
102
103
104
105
106
107
108
109
110
111
112
113
114
115
116
117
118
119
120
121
122
123
124
125
126
127
128
129
130
131
132
133
134
135
136
137
138
139
140
141
142
143
144
145
146
147[root@localhost fastdfs-6.06]# /usr/bin/fdfs_monitor /etc/fdfs/client.conf
[2020-04-27 11:04:39] DEBUG - base_path=/home/yuqing/fastdfs, connect_timeout=5, network_timeout=60, tracker_server_count=2, anti_steal_token=0, anti_steal_secret_key length=0, use_connection_pool=0, g_connection_pool_max_idle_time=3600s, use_storage_id=0, storage server id count: 0
server_count=2, server_index=1
tracker server is 192.168.50.132:22122
group count: 1
Group 1:
group name = group1
disk total space = 24,032 MB
disk free space = 23,958 MB
trunk free space = 0 MB
storage server count = 2
active server count = 2
storage server port = 23000
storage HTTP port = 8888
store path count = 1
subdir count per path = 256
current write server index = 0
current trunk file id = 0
Storage 1:
id = 192.168.50.129
ip_addr = 192.168.50.129 ACTIVE
http domain =
version = 6.06
join time = 2020-04-27 10:37:53
up time = 2020-04-27 10:37:53
total storage = 24,032 MB
free storage = 23,958 MB
upload priority = 10
store_path_count = 1
subdir_count_per_path = 256
storage_port = 23000
storage_http_port = 8888
current_write_path = 0
source storage id = 192.168.50.132
if_trunk_server = 0
connection.alloc_count = 256
connection.current_count = 1
connection.max_count = 3
total_upload_count = 4
success_upload_count = 4
total_append_count = 0
success_append_count = 0
total_modify_count = 0
success_modify_count = 0
total_truncate_count = 0
success_truncate_count = 0
total_set_meta_count = 4
success_set_meta_count = 4
total_delete_count = 0
success_delete_count = 0
total_download_count = 0
success_download_count = 0
total_get_meta_count = 0
success_get_meta_count = 0
total_create_link_count = 0
success_create_link_count = 0
total_delete_link_count = 0
success_delete_link_count = 0
total_upload_bytes = 9792
success_upload_bytes = 9792
total_append_bytes = 0
success_append_bytes = 0
total_modify_bytes = 0
success_modify_bytes = 0
stotal_download_bytes = 0
success_download_bytes = 0
total_sync_in_bytes = 9988
success_sync_in_bytes = 9988
total_sync_out_bytes = 0
success_sync_out_bytes = 0
total_file_open_count = 12
success_file_open_count = 12
total_file_read_count = 0
success_file_read_count = 0
total_file_write_count = 12
success_file_write_count = 12
last_heart_beat_time = 2020-04-27 10:41:53
last_source_update = 2020-04-27 10:50:21
last_sync_update = 2020-04-27 10:43:49
last_synced_timestamp = 2020-04-21 17:37:48 (0s delay)
Storage 2:
id = 192.168.50.132
ip_addr = 192.168.50.132 ACTIVE
http domain =
version = 6.06
join time = 2020-04-21 16:06:02
up time = 2020-04-27 10:21:49
total storage = 42,547 MB
free storage = 42,465 MB
upload priority = 10
store_path_count = 1
subdir_count_per_path = 256
storage_port = 23000
storage_http_port = 8888
current_write_path = 0
source storage id =
if_trunk_server = 0
connection.alloc_count = 256
connection.current_count = 1
connection.max_count = 2
total_upload_count = 4
success_upload_count = 4
total_append_count = 0
success_append_count = 0
total_modify_count = 0
success_modify_count = 0
total_truncate_count = 0
success_truncate_count = 0
total_set_meta_count = 4
success_set_meta_count = 4
total_delete_count = 0
success_delete_count = 0
total_download_count = 0
success_download_count = 0
total_get_meta_count = 0
success_get_meta_count = 0
total_create_link_count = 0
success_create_link_count = 0
total_delete_link_count = 0
success_delete_link_count = 0
total_upload_bytes = 9792
success_upload_bytes = 9792
total_append_bytes = 0
success_append_bytes = 0
total_modify_bytes = 0
success_modify_bytes = 0
stotal_download_bytes = 0
success_download_bytes = 0
total_sync_in_bytes = 9988
success_sync_in_bytes = 9988
total_sync_out_bytes = 0
success_sync_out_bytes = 0
total_file_open_count = 12
success_file_open_count = 12
total_file_read_count = 0
success_file_read_count = 0
total_file_write_count = 12
success_file_write_count = 12
last_heart_beat_time = 2020-04-27 10:41:49
last_source_update = 2020-04-21 17:37:48
last_sync_update = 2020-04-27 10:27:48
last_synced_timestamp = 2020-04-27 10:50:21 (0s delay)
上传测试
执行 FastDFS 自带的测试工具:
1 | [root@localhost fastdfs]# /usr/bin/fdfs_test /etc/fdfs/client.conf upload README.md |
可数据目录下可以看到刚上传的文件:
1 | [root@localhost 00]# pwd |
底层存储
从上面上测试上传返回的路径可以看 FastDFS 存储文件的大至策略。
1 | /group1/M00/00/00/wKgyhF6evuyAFzudAAAJkOV_zlg7474.md |
- FastDFS 不对文件进行分块存储,直接存在到 Storage Server 上,所在存放超大文件取决于操作系统层的文件系统,通常不建议存放超大文件。
- FastDFS 存储是基于分组(Group)的概念,同一个组可以有多个 Storage Server,其中一个 Storage Server 接收到上传的文件,会同步到同组的其它 Storage Server,互为备份。
- 支持存储服务器在线扩容
- 文件上传成功后返回的远程文件地址由:组名、磁盘目录,存储目录,文件名 组成。
配置文件解析
FastDFS 的配置文件示例在原码包的 config 目录下,如下:
1 | [root@localhost conf]# pwd |
client.conf
客户端配置文件:
1 | # connect timeout in seconds(连接超时) |
http.conf
HTTP 配置文件:
1 | # HTTP default content type(默认 http content type) |
tracker.conf
Tracker Server 配置文件:
1 | # is this config file disabled(是否禁用此配置文件) |
storage.conf
Storage Server 存储服务配置:
1 | # is this config file disabled |
storage_ids.conf
Storage Server 存储服务的 ID 和 组名 配置:
1 | # <id> <group_name> <ip_or_hostname[:port]> |
Spring Boot集成
基于 Spring Boot 集成 FastDFS 客户端,实现上传和下载功能。
添加依赖
fastdfs-client-java 最新 jar 包无法在线下载,可下载源码打包安装到本地的 Maven 仓库。
1 | <!--FastDFS--> |
配置文件
详细可查看官方描述:https://gitee.com/fastdfs100/fastdfs-client-java ,下面示例是使用一个 Properties 属性配置文件。
在 Spring Boot 类路径(resources)下创建一个 fastdfs-client.properties 属性文件,也可以是其它文件名,属性如下:
1 | = 5 |
加载配置
可以在静态代码块中加载,还可以在初始化对象之前加载配置。下面示例将配置初始化和上传下载做到一个客户端 Bean中。
1 | /** |
上传下载
模拟前端上传文件,下载文件。创建 Controller 接上前端上传文件的请求,下载的请求。
1 |
|
上传返回的结果:
1 | http://192.168.50.132/group1/M00/00/01/wKgyhF6no22AdiH_AABHkyXi0i0719.png |
Nginx配置
安装Nginx
多个服务集群部署,通过 Nginx 的反向代理来实现负载均衡。FastDFS 最近的版本已不支持将上传文件返回的 URL 放在浏览器中预览,若要实现,可配置 Nginx 将请求路径映射到存储的路径。
参考 Nginx系列(一):Linux 环境安装 Nginx。
fastdfs-nginx-module
安装 Nginx 扩展模块:fastdfs-nginx-module
FastDFS 多个存储节点之间文件同步会可能存在一定的延迟,例如网络延迟,写延迟。当通过 Nginx 反向代理到还未完成同步的节点,则会访问不到文件,而 fastdfs-nginx-module就是为了解决此问题,当出现此问题时,会重新定位到文件同步的源节点(上传存储的原始节点)。
下载
下载fastdfs-nginx-module 源码:
1 | github : https://github.com/happyfish100/fastdfs-nginx-module |
编译安装
编译和安装 fastdfs-nginx-module 模块:
1 | cd nginx-1.16.1 |
修改配置
修改 Nginx 配置文件 nginx.conf,添加路径映射,用于支持浏览器预览。
1 | Notice: |
创建软链接
1 | #step 6. make a symbol link ${fastdfs_base_path}/data/M00 to ${fastdfs_base_path}/data, |
复制配置文件
http.conf 和 mime.types 两个文件在修改 FastDFS 时已经执行了配置文件的安装,这里可以省略
1 | #step 7. copy conf/http.conf and conf/mime.types in FastDFS source path to /etc/fdfs/ and modify http.conf, such as: |
启动Nginx服务
1 | #step 9. restart the nginx server, such as: |
监控错误日志
1 | #step 10. view nginx log file, such as: |
其它参考
Spring Boot 2系列(五十四):分布式文件服务 FastDFS 安装与集成